



NEW TO CELESTIA?
Here's a synopsis of controls & concepts to help you start using the program as quickly as possible. It's also a good review for seasoned users. Additional information can be found on our Help page and in CELESTIA's guides.
CELESTIA
AMBIENT LIGHT
CELES-FACTS
CLOCK
FIELD OF VIEW
INFO TEXT
LABELS
LEFT/RIGHT DRAG
MAGNITUDE LIMIT
MISC
NAVIGATING
CONTROLS THAT . . .
• CHANGE DISTANCE
• MAKE YOU ORBIT
• CHANGE YOUR VIEW
ORBITS
SAFETY VALVE
SELECTION
SPACEFLIGHT
TIME RATE
VIEW OPTIONS
A FEW INTRODUCTORY JOURNEYS
INFO TEXT
Info Text is the small, bluish text often displayed in one or more corners of CELESTIA's window. It provides helpful hints about what body you may be currently observing, how you are observing it and how you are navigating.
Press V a few times to cycle through your three choices for displaying Info Text.
SELECTION
Often you will see the name of an object shown in rather large letters at the top left of CELESTIA's window. This object is your "Selection".
Your Selection is important because it provides one of the easiest ways to move in CELESTIA's universe. As we'll see, after you make an object your Selection, you can easily "go to" it, "center" it, "follow" it, "track" it, etc.
Note that you can change your Selection at almost any time. In addition, what you are viewing at any particular time is not necessarily your Selection. For example, in our center column's image, we are viewing Earth, but Jupiter is our Selection.
CELESTIA provides several ways to "select" an object, i.e. to make an object your Selection. Here are three of the easiest ways:
Note that you can also cancel your Selection at almost any time as follows:
Here are the most common keystrokes that control your Selection. Press:
C to "Center" Selection;
G to "Go To" Selection;
F to "Follow" Selection;
Y to "Sync Orbit" to Selection;
" to "Chase" Selection;
: to "Lock" Selection to Reference Object;
T to "Track" Selection (this is a toggle; to "un-track" you must press T again);
Ctrl + G to "Go To Surface" of Selection.
Each of the above except "Chase" and "Lock" also has an equivalent in CELESTIA's main menu under Navigation. Equally important, pressing Esc will cancel any of the above.
If you test the above controls, you'll find that the meanings of "Center", "Go To" and "Go To Surface" are pretty self-explanatory. The others are further explained in the center column of this page under "NAVIGATING".
SPACEFLIGHT
In addition to navigating with respect to a reference object (as explained in the center column), CELESTIA also lets you move in space somewhat like a spacecraft. Fortunately, CELESTIA's developers have "stretched" current science a little, allowing your spacecraft to exceed the speed of light.
Pressing:
A increases velocity;
Z decreases velocity;
Q reverses direction;
X sets direction of motion toward center of view;
F1 or S stops spaceflight motion;
F2 sets velocity to 1 kilometer per second;
F3 sets velocity to 1,000 kilometers per second;
F4 sets velocity to speed of light (c = 300,000 km/sec);
F5 sets velocity to 10c;
F6 sets velocity to 1 AU per second;
F7 sets velocity to 1 light-year per second.
 Note: if it ever seems that an object keeps moving out of the way as you try to "Follow", "Sync Orbit" to or "Lock" to it, check your Spaceflight Speed at the lower left of CELESTIA's window. If it is not equal to zero, then you need to press S to stop your spaceflight motion.
LABELS
The following keys toggle the associated Labels. Press:
P for Planets;
M for Moons;
B for Stars;
E for Galaxies;
W for Asteroids;
= for Constellations;
N for Spacecraft;
& for Locations;
Shift + W for Comets.
Plus, in 1.6.x, press:
Shift + M for Minor Moons;
Shift + P for Dwarf Planets;
Shift + E for Globulars.
LEFT DRAG,
RIGHT DRAG
To "Left Drag" simply means to drag your mouse while holding down the Left Mouse Button, and to "Right Drag" means to drag your mouse while holding down the Right Mouse Button. We mention this, having encountered on occasion someone confused when told, for example, to "Left Drag" the mouse "to the right". The point is: you can Left Drag or Right Drag your mouse "in any direction."

This page contains a lot of information about CELESTIA in a small space, so don't get discouraged if you don't absorb it all at once. The more you use the program's controls, the more they will make sense to you. Just keep with it; the rewards will be well worth the effort!
Remember: your Selection (named at the top left of CELESTIA's window) is not necessarily the object you are currently viewing!
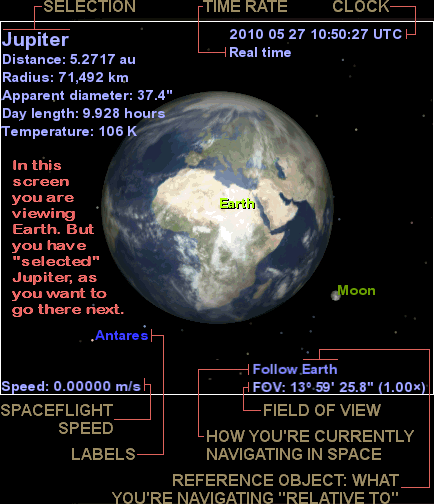
Light-blue text in the corners of CELESTIA's window is your "Info Text". The V key controls the visiblity of your Info Text.
NAVIGATING
Most of the time in CELESTIA, you will probably be navigating relative to some object. We like to call this your "Reference Object," though you will not find this term used in CELESTIA's Help: Controls or in its manual.
Whenever you start a standard release of CELESTIA, it loads, then quickly locates you near Earth and makes Earth your Selection. (As we learned in the left column of this webpage, your Selection's name is displayed in large letters at the top left of CELESTIA's window, so "Earth" will be displayed there after you start the program.) Equally important is that CELESTIA also initially makes Earth your Reference Object.
It is important to understand the
difference between your SELECTION
and your REFERENCE OBJECT. Some
controls affect one but not the other.
Whenever you have "Info Text" turned on, the name of your "Reference Object"—if you currently have one—is shown in small letters at the lower right of CELESTIA's window immediately above your FOV. In addition, a term or phrase in front of the name of your Reference Object describes how you are navigating relative to it. Either "Follow", "Sync Orbit", "Chase" or "Lock" will be displayed, each representing one of the four modes of navigating relative to your Reference Object. (Note that, whenever you have no Reference Object you will also have no navigating mode, and no small text will appear immediately above your FOV. At such times, you are said to be in "freeflight".)
THE FOUR MODES OF NAVIGATING
Before going farther, let's take a look at what each of the four modes of navigating means. Note that in each of the following example links, we deliberately show no Selection (it's been "un-selected") to emphasize that the modes of navigating are specifically relative to your Reference Object.
At left on this page, you found ways to "Follow", "Sync Orbit" to or "Chase" your Selection, i.e. to set or change your navigating mode. In addition:
 The important thing to remember is that—as soon as you begin to "Follow", "Sync Orbit" to or "Chase" your Selection, or change from doing one to another—your Selection also becomes your Reference Object! You are then free to choose another Selection (or another and another . . .), but your current navigating mode relative to your Reference Object will continue until you either:
Here are a few distinctions that may help you keep your Selection and your Reference Object straight. You can choose (or change) your Selection at almost any time. However, your Reference Object has to be your Selection before it can be your Reference Object. In addition, your Reference Object is only chosen or changed when you "apply" a navigating mode to your current Selection.
These distinctions are important because—as we'll now see—some controls "operate on" your Selection, while others "operate on" your Reference Object. Let's take a look at which do which.
CONTROLS THAT CHANGE "DISTANCE"
The following controls change your distance to your Reference Object. If you have no Reference Object—i.e. if none is indicated at lower right—then these controls change your distance to your Selection. If you also have no Selection—i.e. if none is indicated at top left—then these controls have no effect.
Pressing:
Home moves you closer;
End moves you farther away.
With Mouse and Keyboard:
Ctrl + Left Drag "forward" moves you closer;
Ctrl + Left Drag "backward" moves you farther away.
With Mouse only:
Mouse-Wheel rolled "forward" moves you closer;
Mouse-Wheel rolled "backward" moves you farther away.
CONTROLS THAT MAKE YOU "ORBIT"
The following controls work only if you have a Reference Object or a Selection or both. If you do have a Reference Object, they will cause you to "orbit" it. If you have no Reference Object but you do have a Selection, then these controls will cause you to "orbit" your Selection. Note that these controls will not change your distance to the object they are currently causing you to orbit.
Pressing:
Shift + an Arrow key ( ← or → or ↑ or ↓ ) makes you "orbit" around your Reference Object or Selection in the appropriate direction;
With Mouse and Keyboard:
Right Drag "to the left, right, up or down" makes you "orbit" around your Reference Object or Selection in the appropriate direction.
CONTROLS THAT CHANGE YOUR "VIEW"
The following controls alter your View and work whether or not you have a Reference Object and / or a Selection. They alter your View (what and where you may be facing) by changing your orientation in space. Though you may already be moving relative to your Reference Object or to your Selection, these controls do not contribute to any change of distance to either.
Pressing:
Number Pad 5 slows and stops the following keys' "panning" and rotation;
Number Pad 4← makes you look left;
Number Pad 6→ makes you look right;
↑ or Number Pad 8↑ makes you look down;
↓ or Number Pad 2↓ makes you look up.
(Note: it would seem that the up and down Arrow Keys should work opposite to the way they do. This is one of CELESTIA's minor inconsistencies.)
← or Number Pad 7 rotates View clockwise;
→ or Number Pad 9 rotates View counter-clockwise.
(Note: 1.6.x's Altazimuth Mode disables the ← and → keys' rotation if you are not on a planet's surface.)
With Mouse and Keyboard:
Left Drag "to the left, right, up or down" makes you look in the appropriate direction;
Ctrl + Left Drag "to right" rotates View clockwise;
Ctrl + Left Drag "to left" rotates View counter-clockwise.
• • •
By contrast to the View controls above, the following controls will change your View "only if" you have a Selection. They have no direct affect on your Reference Object.
Pressing:
C "Centers" your Selection;
T "Tracks" your Selection. You'll find that "Tracking" is somewhat of a unique control. It centers your Selection in your view and keeps it centered. As this "over-rides" several other controls, CELESTIA lets you know when you are "Tracking" an object by displaying "Track" and the object's name in small letters above your navigating mode and your Reference Object (if you have one.) The T key toggles "tracking", so pressing it once turns it on, pressing it again turns it off. Note: you can also turn off Tracking by pressing Esc but this will also cancel your navigating mode and your Reference Object (i.e. Esc puts you in "freeflight".)
AN EXCEPTIONAL CONTROL: "Goto Object..."
In CELESTIA's main menu under Navigation, you'll find an exceptional control which bears mentioning. This is the Goto Object... command.
If you choose Goto Object... in the main menu, and you already have a Selection that is not a star or galaxy, then you'll see your Selection's name listed in the dialog box when it opens. In addition, your latitude and longitude above your Selection will be listed along with your distance from it. This means that Goto Object... provides one of CELESTIA's best ways for you to "get your bearings"—either in space or at an object's surface! You may change any of these values, and when you press the dialog box's Go To button, you'll be taken to any latitude, longitude and distance you've entered!
"Goto Object..." provides one of
CELESTIA's best ways for you to
"get your bearings"—either in
space or at an object's surface!
Note that you can also change the name of the object in the dialog box, even to the name of a star or galaxy. No matter what type of object you choose, when you press the Go To button you'll "go to" your object and "sync orbit" to it. So this object will then be your Selection and your Reference Object. And there's one more added touch if your object is neither a star nor a galaxy: when you arrive at your object, its rotation axis will be oriented vertically in your view!
To say the least, this can be a powerful control when used properly. So you may want to test it and practice using it very early in your explorations.
INTRODUCTORY JOURNEYS
Here are a few introductory journeys to give you a taste of how easy it can be to voyage through CELESTIA's universe! Just follow the simple instructions below.
After you initially run CELESTIA, you should find yourself facing Earth. Note: if you don't see small light-blue text (your Info Text ) in the corners of CELESTIA's window, then press V and it should appear.
TO "JUPITER" AND BACK
CONGRATULATIONS! You've just journeyed to Jupiter and back!
TO "SATURN" AND BACK
CONGRATULATIONS! You've just journeyed to Saturn and its moon Pan and back to Earth!
TO "IDA & DACTYL" AND BACK
CONGRATULATIONS! You've just journeyed to the asteroids Ida and Dactyl and back to Earth!
These three quick journeys should whet your appetite for more complex adventures. Try the controls you've just used for other bodies, and then start using the controls listed elsewhere on this page. Soon you'll be traversing the Solar System like a pro!
MAY ALL OF YOUR JOURNEYS BE JOYOUS!
Home Intro News Gallery Sky-Gifts Bonuses Tips
Learning Ctr Help Links Credits Legal Contact Us
© 2007-
by Gary M. Winter. All rights reserved.
Interested in political cartoons and humor?
Check out The HIPPLOMATS™.
SkyMarvels: Your Key to the Sky and the Universe! SkyMarvels, Sky Marvels, SkyMarvels.com, Astronomy Interactives, celestia4all, celestiaforall, CELESTIA, astronomy, space, simulations, animations, downloadable astronomy posters, stars, planets, Inner Planets, Outer Planets, Inferior Planets, Superior Planets, moons, asteroids, comets, Oort Cloud, galaxy, galaxies, Milky Way, Andromeda, globular clusters, binaries, quasars, black holes, supermassive black holes, telescope, telescopes, planetarium, software, freestuff, satellites, add-ons, addons, scripts, eclipses, Solar Eclipses, Lunar Eclipses, Solar Eclipse Finder, Lunar Eclipse Finder, mutual eclipses, transits, occultations, Solar System, CELES-TOOLS, celeSTARrium, CELX, CELX programming, Freebies, Bonuses, multiple views, atronomical unit, light year, parsec, meteors, meteor showers, Perseids, Geminids, Leonids, barycenter, time, Time Zones, tides, alignments, conjunctions, oppositions, seasons, apogees, perigees, aphelion, perihelion, Earth, Luna, Mercury, Venus, Mars, Jupiter, Galilean Moons, Io, Europa, Ganymede, Callisto, Saturn, Titan, rings, Uranus, Neptune, Triton, E-MSpectrum, electromagnetic spectrum, astronaut, equinoxes, solstices, precession, rotation, spin, inclination, tilt, Ecliptic, orbits, ellipse, parabola, hyperbola

Donate safely with: PayPal
and receive one or more
Sky-Gifts. Your support is greatly appreciated!
NOTE: you do not need a PayPal account to donate.
ASTRONOMY
SKY VIEWING
SOLAR SYSTEM
THE SUN
MERCURY
VENUS
EARTH
THE MOON
MARS
JUPITER
SATURN
URANUS
NEPTUNE
SMALLER WORLDS
STELLAR OBJECTS
EXOPLANETS
DEEP-SKY OBJECTS
SCALE OF THE COSMOS
———————
SKY-FUN / SKY-GAMES
TIME RATE
Speed up or slow down time to help you view countless events more effectively.
Press:
J to reverse Time;
K to decrease Rate to 1/10;
L to increase Rate 10x;
\ to set Rate to Real Time.
Plus, in 1.6.x, press:
Shift + K to decr. Rate ½
Shift + L to incr. Rate 2x.
CLOCK
Whenever you need to re-set CELESTIA's clock to "now", i.e. the present system time on your computer, press ! (exclamation mark).
To set CELESTIA's clock to a different time, go to the main menu under Time: Set Time... Note that you cannot use the Number Pad's keys to re-set the time. You must either use the Number Keys above the letters of your keyboard or use the Tab and Arrow keys.
Note: if CELESTIA's clock is not displayed in the top-right corner of its window, just press the V key until you see it. Generally, it is best to run CELESTIA with its clock displayed, as it tells you how fast time is passing during any simulation.

FIELD OF VIEW
Field of View (FOV) tells you the "angular" amount of sky you are currently looking at. CELESTIA shows this at the bottom-right of its window when Info Text is displayed. While cameras that employ rectangular film often give their FOV's both horizontally and vertically, in CELESTIA you're always shown only the "vertical" FOV of your view, i.e. the FOV measured from the "top to bottom" of a view.
An intuitive comparison that you might want to remember is: when held out at arm's length, your index finger is roughly 1° in width.
Being able to change your FOV in CELESTIA helps you examine objects and events in subtle ways. Decreasing FOV is the same as "zooming in," while increasing FOV is the same as "zooming out."
Press:
, (comma) to zoom in;
. (period) to zoom out.
With Mouse and Keyboard:
Shift + Right Drag "forward" zooms in;
Shift + Right Drag "back" zooms out.
In addition, pressing your Mouse-Wheel-Button (if you have one) toggles your last FOV and CELESTIA's default FOV.
Note that your view's Visual Magnification is also given (just to the right of your FOV in parentheses.) These two properties have an inverse relationship; when one gets larger, the other gets smaller, and vice-versa.
Note too that CELESTIA does not provide a way to change your Field of View in its main menu. So you must use the controls mentoned above.
SAFETY VALVE
Every now and then you may get "lost in space." But don't worry. In most cases, you can use the following as a kind of "safety valve" to get you back to Earth.
1) press H (selects Sun);
2) press 3 (above W and E keys; this selects Earth);
3) press G (to go to Earth);
4) press your Mouse-Wheel-Button if needed (to re-set CELESTIA's default FOV).
Note: there are rare times when CELESTIA can get "mixed up" and be unable to return you to Earth. If this happens, you have no option but restarting the program.
MISC
The foregoing controls will help you get started using CELESTIA, but they do not constitute a complete list. Here are others that may also make your early explorations easier.
AMBIENT LIGHT
This essentially controls the amount of light displayed on the "dark sides" of planets, moons, etc., though it also effects light quality of the illuminated sides of objects. Turning Ambient Light up or down can make events like eclipses easier to study.
Press:
{ to turn down Ambient Lt;
} to turn up Ambient Lt.
MAGN. LIMIT
Press:
[ to see fewer objects;
] to see more objects.
VIEW OPTIONS
CELESTIA's menus provide equivalents of most of the keyboard controls that are available in the program. In addition, one of the most useful aspects of the main menu can be found under Render: View Options... Here you'll find a kind of "central station" where many aspects of CELESTIA can be turned on or off in one dialog box. As one of CELESTIA's most convenient features, you'll be using this often.
ORBITS
The Render: View Options... dialog box, mentioned above, lets you choose the types of orbits you want CELESTIA to display: the orbits of moons, planets, comets, etc. You may then toggle your chosen orbit types on and off from the keyboard by pressing O
CELES-FACTS
DISPLAYED DISTANCES
When you have a Selection, you'll notice that CELESTIA displays its distance from you in its Info Text at top left. But you should be aware that CELESTIA does not display distances to all objects in the same way!
The displayed distance to a planet, moon, asteroid, etc. is the distance to its "surface", while the displayed distance to a star is the distance to its "center".