



SKY VIEWING
SOLAR SYSTEM
THE SUN
MERCURY
VENUS
EARTH
THE MOON
MARS
JUPITER
SATURN
URANUS
NEPTUNE
SMALLER WORLDS
STELLAR OBJECTS
EXOPLANETS
DEEP-SKY OBJECTS
SCALE OF THE COSMOS
———————
SKY-FUN / SKY-GAMES
You'll find that certain simple refinements to CELESTIA's environment can prove quite useful. For example, you can resize "Info Text" and "Label Text" to make them easier to read (particularly on newer high-resolution screens). CELESTIA also lets you do things like making planetary] rings and orbital lines look smoother, which you'll want to do if you make a movie or save an image file.
CELESTIA
60° RULE
CLOSE-IN MANEUVERS
EASIER-TO-READ TEXT
EXPERIMENT w/ LINKS
FINDING EQUINOXES
SAFE CHANGES
SMOOTH RINGS/ORBITS
SUNLIGHT/DARKNESS
TEXT EDITORS
VIEWING PRECESSION
TEXT EDITORS
Changing certain attributes in CELESTIA requires working with files. This requires a text editor.
A "text editor" is like a word-processor, but different in that it leaves out all the fancy formatting. This is desirable because CELESTIA requires that you save most of its files as "pure" text.
Windows "Notepad" is a text editor, but a simple one. It's fine for little things, but other text editors like Notepad2 and Notepad++ (which are free) offer far better features. At the very least you'll want a text editor that supports the UTF-8 encoding standard, as do both of the above.
Most text editors are similar in their basic operations. So, if you have any experience with one, you should have little difficulty with using another. Just remember that when you save one of CELESTIA's files, you save it as "pure" text.
Also, make sure you read and fully understand the center column on this page, before you make changes to any of CELESTIA's files.
EXPERIMENT WITH LINKS
Any CELESTIA link on this site can be run over and over again. So don't be afraid to experiment with them. You are free to change any link's Selection or to change its Navigating Mode. You are likewise free to change its Reference Object. You can change them one at a time, or all together. Change your distance to objects, your orientation in space.
The more you experiment, and observe the effects of any changes you make when running CELESTIA's links, the faster (and more often) you'll find yourself venturing out into the farthest reaches of CELESTIA's universe!
From our Gallery here are a few example links. They will transport you to some of the most intriguing and dazzling places and events we have found in CELESTIA! Enjoy! (Click here for more info about CELESTIA's links.)
Jupiter: a mutual eclipse of two moons occurs during a simultaneous triple Solar Eclipse (1.6.x) (1.4.1). And here it is from another angle (1.6.x) (1.4.1). WOW!
Saturn: a beautiful alignment of four of its major moons (1.6.x) (1.4.1). And here it is from another angle (1.6.x) (1.4.1). AWESOME!
Mercury: an engaging double sunrise on this essentially atmosphere-free inner planet (1.6.x) (1.4.1).
Venus: a transit of the Sun, (the "apparent" curve in its path is caused by "tracking" the Sun) (1.6.x) (1.4.1).
Earth's Moon: "ahead of it" as it moves through Earth's shadow (total lunar eclipse) (1.6.x) (1.4.1).
Mars: moon Phobos transits the Sun as viewed from the surface of the Red Planet (1.6.x) (1.4.1). And here both Phobos and Deimos transit the Sun at the same time (1.6.x) (1.4.1).
Mars: historic transit of Jupiter just before sunrise (1.6.x) (1.4.1).
Saturn: another convergence of moons, this stunning one on the planet's limb (edge) (1.6.x) (1.4.1). GORGEOUS!
Uranus: a simultaneous triple Solar Eclipse (1.6.x) (1.4.1).
Neptune: moon Triton's shadow crosses the Great Blue Spot (1.6.x) (1.4.1). And here it is from the side and zoomed out (Triton is near top-right) (1.6.x) (1.4.1).
Ida and Dactyl: binary asteroid (1.6.x) (1.4.1).
Alpha Aurigae: multiple star system (1.6.x) (1.4.1).
Gliese 896: an impressive multiple star system (1.6.x) (1.6.x w/star orbits) (1.4.1).
CLOSE-IN MANEUVERS
In CELESTIA, it can become frustrating at times when you try to move very close to a spacecraft (or an irregular asteroid) and then attempt to maneuver there. Once you get within a certain distance to your Selection, or your Reference Object, you can't seem to get any closer. And in version 1.4.1 in particular, Right-Dragging your mouse changes your orientation terribly slowly. We call this problem "CELESTIA's radius barrier," since maneuvering becomes so difficult as you get increasingly closer to CELESTIA's defined radius of your Selection or Reference Object.
There are answers to this however. You simply need to place yourself "inside" the radius of the object. Once you're there, maneuvering becomes easy. Here are two methods by which you may place yourself "inside" the radius of the object and break "CELESTIA's radius barrier."
Method 1: hold down the Home key. This can take more than a few seconds, so you must be patient. But eventually you will "break through" the barrier.
Method 2:
- In CELESTIA's menu, open"Navigation: Goto Object...".
- Being careful of your units, in the "Distance" field of the "Go To Object" dialog box, enter a distance less than the object's radius (shown at upper left in Info Text.) About half of the radius works best.
- Add a negative sign in front of the distance you entered.
- Click on the "Go To" button.
With either method, you will move inside the object's radius, where maneuvering will be easy.
These Tips let you customize features in CELESTIA to enjoy its best performance! Learn the tricks which veteran CELESTIA fans employ to create the most exciting voyages, animations and views possible.
Donate safely with: PayPal
and receive one or more Sky-Gifts.
Your support is greatly appreciated!
NOTE: you do not need a
PayPal
account to donate.
INSTALLATION TIPS
WINDOWS
On a PC computer running the Windows operating system, it is preferable to install CELESTIA in a directory (folder) other than the C:\Programs directory. For example, first create a directory named C:\Celestia and install CELESTIA there.
FILE ASSOCIATION
When you are installing CELESTIA, you may be prompted with a screen that has check boxes that include:
Associate: cel://URLs
Associate: .cel and .celx scripts
If so, make sure that each of these boxes is checkmarked before continuing with the installation. The first checked box insures that CELESTIA is able to run the exciting 1.6.x and 1.4.1 Links on this website. The second allows you to run scripts directly from a File List by double-clicking on the file name.
SAFE CHANGES
 The safest way to change certain attributes in CELESTIA requires a.) preserving and renaming any "original" files that control the attributes you wish to change, and then b.) substituting "copies" whose contents can be modified. This is not difficult, and it insures that you always retain CELESTIA's "original" files in case you make a mistake or later want to undo any of your changes. The basic steps in preserving and renaming an "original" file, and making a changeable "copy" of it, are as follows.
- Make a "copy" of the "original" file in its same directory. (Your operating system will give the "copy" a different name which you will change AFTER Step #2 below.)
- Rename the "original" file by simply adding the letters ORIG to the end of its 3-letter extension. (This makes it impossible for CELESTIA to read the "original" file, which is kept in its proper directory if you ever want to revert back to using it. Note: only the file's "name" has been changed; its "contents" have not been changed.)
- Rename the "copy" made in Step #1 to the original file's original name.
Now you may make any desired changes to the "copy". (Remember: never make changes to the "contents" of an "original" file.) Which files to change and how to change them are described elsewhere on this page.
EASIER-TO-READ TEXT
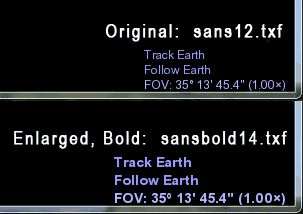
For Info Text and Label Text, CELESTIA's default font has "strokes" that are only one pixel wide. This makes them hard to read, especially on newer screens that are 1400 or more pixels wide. Let's see how to make Info Text and Label Text easier to read.
Using the method of making safe changes explained above, we'll change CELESTIA's "original" celestia.cfg file. This file should be found in the main directory in which you installed CELESTIA.
- Make a "copy" of celestia.cfg in its same directory. (Your operating system will give the "copy" a different name which you will change AFTER Step #2 below.)
- Rename celestia.cfg to celestia.cfgORIG
- Rename the "copy" you made to celestia.cfg
It is now safe to open your new "copy" of celestia.cfg in a text editor and change it as follows. Remember: free text editors like Notepad2 and Notepad++ are best for this task as they support UTF-8.
- Open celestia.cfg
- Find the lines that read: Font "sans12.txf" LabelFont "sans12.txf"
- Change the lines to: Font "sansbold14.txf" LabelFont "sansbold14.txf"
- Save the file.
- Restart CELESTIA.
As shown in the comparison below, from now on when you run CELESTIA, your Info Text and Label Text will appear in a bolder, two-pixel-stroke font that is much easier to read than the original default font.
SMOOTHER RINGS AND ORBITS
CELESTIA draws its planetary rings and orbital paths in line segments, rather than actual curves. The more segments it uses, the smoother the rings (especially Saturn's) and orbital paths will look. But there's a trade-off here, because the more segments CELESTIA uses to draw these features, the slower it will operate.
To find the most desirable balance between appearance and performance, you might want to try experimenting with changing how smoothly CELESTIA draws rings and orbital paths. For example, if you want to use CELESTIA to create a movie or a high-resolution picture of Saturn, you may want to temporarily have it draw its planetary rings smoother to obtain the best effect.
How smoothly CELESTIA renders its rings and its orbital paths is controlled in the celestia.cfg file. If you understand and have done the the example above, it is safe for you to open your current "copy" of celestia.cfg in a text editor and change it as follows.
- Open celestia.cfg
- Find the lines that read: OrbitPathSamplePoints 100 RingSystemSections 100
- Change the lines to: OrbitPathSamplePoints 200 RingSystemSections 200
- Save the file.
- Restart CELESTIA.
From now on, when you run CELESTIA it will draw its rings and orbital paths twice as smoothly as the default. Using the same procedure, at any time you can increase or decrease the "appearance vs. performance" smoothness to find the optimum for your computer or for a particular project.
FINDING THE EQUINOXES IN 1.6.x
Note: for an explanation of the concept of the equinoxes, click here.
When you display the Celestial Sphere in CELESTIA, what you see is the grid for the J2000 epoch, not the continually updated grid for the "equinox of date". This isn't a bug or an error; rather it is just the same "practical simplification" commonly used when astronomers refer the position of any sky object to the J2000 epoch.
However, this simplification means that, when we see the Sun cross "CELESTIA's" Celestial Equator, we are actually seeing it cross where the "true" Celestial Equator WAS at the beginning of the year 2000! In reality, Earth's precession makes the "true" Celestial Equator continually "reorient" itself relative to the Ecliptic! So the further we are from the year 2000 in CELESTIA, the less accurately the Sun's crossings of the program's Celestial Equator will depict the equinoxes.
How much difference is there between the Sun's moving through CELESTIA's (J2000) Celestial Equator and the "true" (of date) one? It accumulates at roughly 20 minutes per year! So, on 2010 March 20, the Sun appears to cross CELESTIA's Celestial Equator some 3 hr 20 min AFTER the real Vernal Equinox ( )! Again we stress that this is not a bug or an error in CELESTIA, for its approach too has benefits which make its use common in astronomy.
Fortunately, there are several ways that we can find the equinoxes with good precision in CELESTIA 1.6.x. For now, we'll offer one method and save others for future months.
This method takes advantage of the fact that CELESTIA provides a way to see the updated plane of the Celestial Equator continually over time. This is through the use of Earth's Planetographic Grid. So first click on this (1.6.x only) link that shows Earth.
Next Right Click on Earth, then select "Reference Marks" ("Reference Vectors" in ver. 1.6.0), and then select "Show Planetographic Grid". Now Right Click on Earth again, then select "Reference Marks", and then select "Show Body Axes". From where we are about to go, this will help you see the Celestia Equator.
Now, the trick is to place yourself "inside" and very near the center of Earth, and then "look out" toward the Sun. This (1.6.x only) link places you only a tiny fraction of a millimeter from Earth's center! It also tracks the Sun and zooms in on it to an extremely high degree. By now, you're probably getting the idea of what we're going to do.
To give us a very high accuracy, this next (1.6.x only) link turns off CELESTIA's stars, though you can still see a tiny dot representing the Sun's center. On some computers the Celestial Equator will blink somewhat, but you should get a very good idea of where it is and when the Sun's center crosses it. You can also see that CELESTIA shows the Sun crossing the Planetographic Celestial Equator within a minute or so of 3:09 UTC, the theoretical Autumnal Equinox time on 2010 September 23! In addition, you can zoom in even further to get the highest accuracy possible in CELESTIA!
Now, if you click on this (1.6.x only) link, you'll see the how far the "true" (of date) Celestial Equator is from CELESTIA's J2000 one!
You can likewise change CELESTIA's time to verify the Sun's similar crossings of the Celestial Equator for other equinoxes. Whenever you're done, you can click on this (1.6.x only) link to take you back "outside" of Earth again. Don't forget to turn off the Reference Marks you turned on as described above.
Using this technique in version 1.6.x, you'll be able to find equinoxes with a precision of minutes, rather than hours! And you'll probably also realize that what you can do with CELESTIA is limited only by your own imagination.
Home Intro News Gallery Sky-Gifts Bonuses Tips
Learning Ctr Help Links Credits Legal Contact Us
© 2007-
by Gary M. Winter. All rights reserved.
Interested in political cartoons and humor?
Check out The HIPPLOMATS™.
SkyMarvels: Your Key to the Sky and the Universe! SkyMarvels, Sky Marvels, SkyMarvels.com, celestia4all, celestiaforall, CELESTIA, astronomy, space, simulations, animations, downloadable astronomy posters, stars, planets, Inner Planets, Outer Planets, Inferior Planets, Superior Planets, moons, asteroids, comets, Oort Cloud, galaxy, galaxies, Milky Way, Andromeda, globular clusters, binaries, quasars, black holes, supermassive black holes, telescope, telescopes, planetarium, software, freestuff, satellites, add-ons, addons, scripts, eclipses, Solar Eclipses, Lunar Eclipses, Solar Eclipse Finder, Lunar Eclipse Finder, mutual eclipses, transits, occultations, Solar System, CELES-TOOLS, celeSTARrium, CELX, CELX programming, Freebies, Bonuses, multiple views, atronomical unit, light year, parsec, meteors, meteor showers, Perseids, Geminids, Leonids, barycenter, time, Time Zones, tides, alignments, conjunctions, oppositions, seasons, apogees, perigees, aphelion, perihelion, Earth, Luna, Mercury, Venus, Mars, Jupiter, Galilean Moons, Io, Europa, Ganymede, Callisto, Saturn, Titan, rings, Uranus, Neptune, Triton, E-MSpectrum, electromagnetic spectrum, astronaut, equinoxes, solstices, precession, rotation, spin, inclination, tilt, Ecliptic, orbits, ellipse, parabola, hyperbola
JAVASCRIPT AND OTHER ENHANCED FEATURES
Note that Javascript must be enabled in your browser to use SkyMarvels™.
In addition SkyMarvels links to some sites that offer enhanced graphic features using Unity
![]() ,
Java
,
Java
![]() ,
WebGL , Flash
,
WebGL , Flash
![]() and others. These are completely free, though you may need to download or enable their latest versions to run some of their newest interactives.
and others. These are completely free, though you may need to download or enable their latest versions to run some of their newest interactives.
VERY IMPORTANT! Most major browsers have now eliminated support for Adobe Flash. Instead of running an interactive directly, most give you the option to download it, so you can run it yourself. However, browsers like Google Chrome and Safari may block a Flash interactive in some cases.
HALF OF EARTH IN SUNLIGHT & DARKNESS
While running CELESTIA, how would you like to see which half of Earth is in sunlight and which is in darkness? And position yourself directly over the center of either half? SkyMarvels™ makes it easy! And you can see it accurately at any time from 2000 BC to 4000 AD!
First, with CELESTIA running, select the appropriate link below:
Next, click on the border of CELESTIA's window to make it your active window.
And last, simply change CELESTIA's time to any time you wish!
For example, if you press the exclamation mark ( ! ), which sets CELESTIA's time to NOW, you'll see the current half of Earth in sunlight or darkness! Of course, you may also set CELESTIA's clock to any time you wish in its main menu.
With the "sunlight" link, the center of your view will be Earth's "subsolar point", where the Sun is directly overhead. With the "darkness" link, the center of your view will be the point on Earth directly opposite the Sun, a point sometimes called our Earth's "midnight point".
Both of these points can be very helpful in determining whether particular sky objects are visible at a certain time.
EXTRA TIP: in version 1.6.x, you can show Earth's terminator to verify that you are looking directly at either the sunlit or dark half of Earth. First, Right Click on Earth, then select "Reference Vectors", and then select "Show Terminator".
60° RULE
If you use CELESTIA 1.4.1, here's a handy trick that's useful if you visit white dwarfs, neutron stars or pulsars.
In 1.4.1, when Info Text is turned on and you have a star selected, the upper left corner of your screen displays the star's radius in solar radii (Rsun) rounded to 2 decimal places. While precise enough for most stars, this breaks down for pulsars, other neutron stars and some white dwarfs, which are so small that CELESTIA must show their radii—rounded to 2 decimal places—as 0.00 Rsun! For example, white dwarf HIP 80300 in Scorpius (1.4.1 only). Of course, since CELESTIA rounds HIP 80300's radius to 0.00 Rsun, we're forced to wonder: "what then is the size of this small stellar object?"
Even when a very small star's radius can be rounded to 0.01 Rsun, the body may be anywhere from 3,480 km to 10,440 km in radius! That's quite an uncertainty, as in the case of HIP 8709 (1.4.1 only).
Nonetheless, in 1.4.1 you CAN determine the sizes of the smallest stars with good accuracy using the "60° Rule." It takes a few steps, but after trying it a time or two, you'll do it without even thinking.
- Select a white dwarf or pulsar (or any other star for that matter) and center it on your screen by pressing the C key.
- In CELESTIA's menu, choose Render: View Options. . . When the View Options box appears, un-check Atmospheres to more easily see the stellar object's diameter.
- Now change your distance to the stellar object you have selected so that it just fills your screen vertically. For finer control you should use Ctrl + Left Drag.
- When you're at the distance where the star just fills your screen vertically, read this distance in the upper left of your screen. THIS DISTANCE EQUALS THE DIAMETER OF THE STAR!
Let's look at a few examples.
- Our first White Dwarf mentioned above: HIP 80300 (1.4.1 only). You'll note that CELESTIA 1.4.1 does list its radius as 0.00 Rsun. So, with our Field of View set to 60° and our distance listed as just over 5,100 km, this star thus has a DIAMETER of almost 5,100 km, or a radius of about 2,550 km! WOW! This stellar inferno is just a little larger than Jupiter's moon Callisto!
- White Dwarf: HIP 8709 (1.4.1 only). Applying the "60° Rule," we read the distance at the upper left and conclude that this wonder has a DIAMETER of about 7,400 km. That's only slightly larger in diameter than Mars!
The "60° Rule" works for stars because CELESTIA defines distance to a star as the distance to its center. Here's a link to show that it works for the Sun (1.4.1 only) which does have a diameter of 1,392,000 km!
You do need to be careful about one thing, the oblateness of some stars. The radius that CELESTIA displays is the equatorial radius, so you'll have to rotate any oblate star 90° before you alter its distance to fill your screen.
Does this work for planets too? Not with a 60° FOV. CELESTIA defines distance to a planet as the distance to its surface, so you need to change the FOV from 60° to 38.94° (38°56'24") for it to work for planets and for reasonably spherical moons and asteroids, etc. Here's Earth to prove it! (1.4.1 only)
Just as we saw with stars, you do have to turn oblate objects like Jupiter on their sides when using the 38.94° FOV (1.4.1 only). However, this does not work for highly irregular objects (like the asteroid Ida), which lack the sphericity to produce the "horizon-effect" upon which the rule depends. Fortunately, a "38.94° Rule" is unnecessary for planets and moons, etc. because CELESTIA 1.4.1 lists the radii of even the smallest ones.
In 1.6.x, the "60° Rule" is unnecessary, as radii of white dwarfs, neutron stars and pulsars are now given in kilometers. Even so, you can still use it to test CELESTIA's 1.6.x's accuracy if you're so inclined. In any event, it's good to know that 1.4.1 users can now easily find the sizes of the remarkably small yet awesomely powerful stellar furnaces that populate CELESTIA's universe! Enjoy!
VIEWING EARTH'S PRECESSION IN 1.6.x
One of CELESTIA 1.6.x's improvements is the ability to depict Earth's precession, a "wobble" that causes each of our poles to trace a circle against the background stars every 25,800 years. This fundamental motion of Earth causes it to have different North Stars during this 25,800-year cycle!
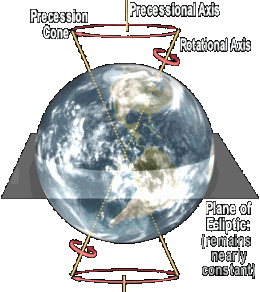
If we look "down" from our current North Star, Polaris (alpha Ursae Majoris), with time sped up a good bit, Earth's wobble is quite evident (1.6.x only). Of course, this link's view does not look "down" along Earth's "precessional" axis. Instead, that line tilts to our left as we look down from Polaris. (Note: Earth's shadow will be less distracting if you turn up Ambient Light by pressing } a few times. After finishing with the following precession links, you'll want to turn Ambient Light back down by pressing { a few times.)
In our next view, we see that the north end of Earth's precessional axis points toward the constellation Draco (1.6.x only), while the other end points toward the southern constellations of Dorado and Pictor (1.6.x only). We see that the direction of Earth's wobble is clockwise when we look down on Earth's Northern Hemisphere.
Our next view of Earth, "from the side," (1.6.x only) gives us a perspective similar to that of our diagram above. If this seems a little frantic to you, just remember that each time Earth completes one single precessional "wobble" (25,800 years), it spins on its axis roughly 9½ million times!
Finally, since Earth boasts different "North Stars" during its 25,800-year precessional cycle, let's see what star "held that honor" during the building of the pyramids! Here, (1.6.x only) in this view looking "straight up" from our Earth's North Pole in the astronomical year -2818 (2819 BCE), we see that the "North Star of the Pharoahs" was Thuban (alpha Draconis)! Now press your C key, while looking at Thuban very carefully, to appreciate just how close it was to the North Celestial Pole in that era. According to CELESTIA, it was less than 0.2° from directly over the pole!
